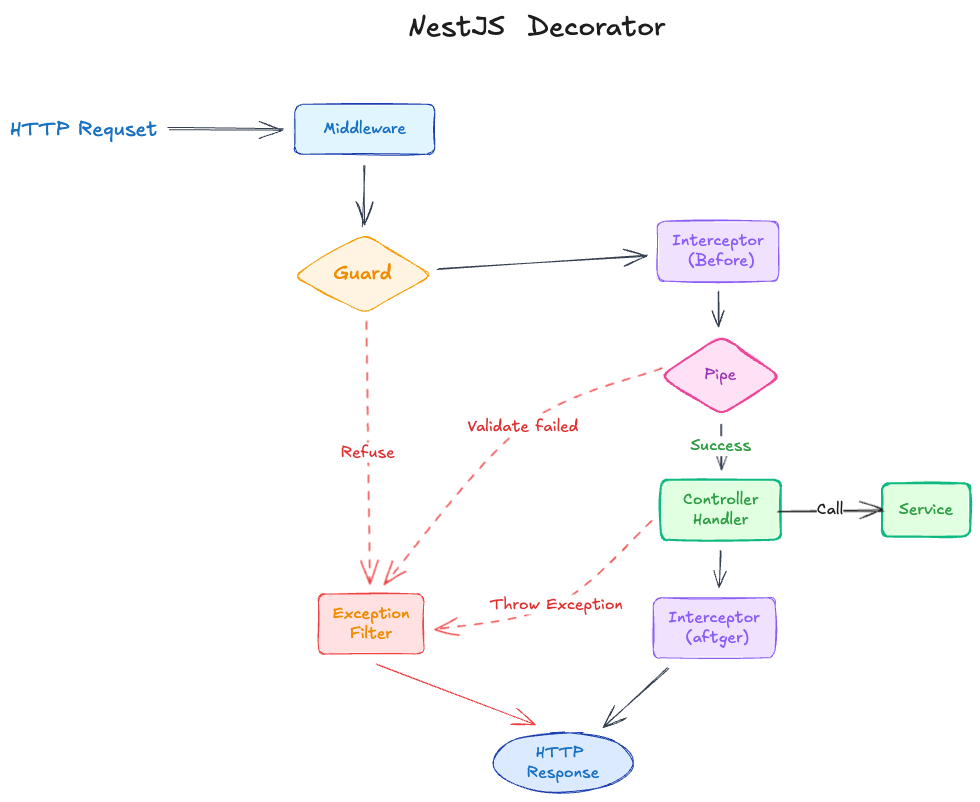
一个 HTTP 请求进入 NestJS 后,会经历一串装饰器的处理:Middleware → Guard → Interceptor (Before) → Pipe → Handler → Interceptor (After) → Exception Filter。这些装饰器像流水线,每个环节负责不同的职责。这篇文章我梳理了这些装饰器的流程以及如何协同工作。
有哪些装饰器?执行顺序是什么?
记住这个图, 你后面会发现,这真的是精华
| 类型 | 解释 | 例子 |
|---|---|---|
| Middleware | 最先执行,通常用于日志、CORS、认证前置逻辑 | LoggerMiddleware、AuthMiddleware |
| Guard | 决定请求是否继续,适合做权限校验 | AuthGuard、RolesGuard、RateLimitGuard |
| Interceptor (Before) | 在 Handler 前执行,可修改请求数据或记录时间戳 | TransformInterceptor、CacheInterceptor |
| Pipe | 负责参数转换和校验,是最后一道防线 | ValidationPipe、ParseIntPipe、TrimPipe |
| Controller(Handler) | 业务逻辑的核心 | createUser()、findOne()、deleteUser() |
| Interceptor (After) | 在 Handler 后执行,可修改响应或记录耗时 | TransformInterceptor、CacheInterceptor、SanitizeInterceptor |
| Exception Filter | 兜底机制,捕获所有异常并格式化响应 | GlobalExceptionFilter、DatabaseExceptionFilter |
作用域支持:
| 类型 | 全局 | Controller 级别 | Method 级别 | Param 级别 |
|---|---|---|---|---|
| Middleware | app.use() / AppModule.configure() | ❌ | ❌ | ❌ |
| Guard | app.useGlobalGuards() | @UseGuards() | @UseGuards() | ❌ |
| Interceptor | app.useGlobalInterceptors() | @UseInterceptors() | @UseInterceptors() | ❌ |
| Pipe | app.useGlobalPipes() | @UsePipes() | @UsePipes() | @Param('id', ParseIntPipe) |
| Exception Filter | app.useGlobalFilters() | @UseFilters() | @UseFilters() | ❌ |
执行顺序:全局 → Controller 级 → Method 级
选择建议:
- 全局:统一错误格式、请求日志、数据校验
- Controller 级:特定模块的通用逻辑(如缓存、权限)
- Method 级:特定接口的精细控制(如限流、角色权限)
Middleware:第一道关卡
Middleware 是最先接触请求的层级,运行在路由处理之前。它的特点是无法访问 NestJS 的依赖注入(DI)容器,只能操作原始的 req 和 res 对象。
典型用途:请求日志、CORS 处理、body 解析、静态资源服务
访问日志
@Injectable()
export class LoggerMiddleware implements NestMiddleware {
  use(req: Request, res: Response, next: NextFunction) {
    const startTime = Date.now();
    const { method, originalUrl, ip } = req;

    res.on('finish', () => {
      const { statusCode } = res;
      const responseTime = Date.now() - startTime;
      console.log(`${method} ${originalUrl} ${statusCode} ${responseTime}ms - ${ip}`);
    });

    next();
  }
}

// 全局注册
export class AppModule implements NestModule {
  configure(consumer: MiddlewareConsumer) {
    consumer.apply(LoggerMiddleware).forRoutes('*');
  }
}注意: middleware拿不到response body,Middleware 适合记录 HTTP 访问日志:路径、状态码、耗时、IP。生产环境推荐用这种方式,性能好且日志量可控。如果需要记录响应体内容(如支付接口)等关键业务更加详细的日子,可以用后面的 Interceptor实现
认证 Token 的预处理
在某些场景下,需要在 Middleware 阶段解析 JWT 并注入用户信息,类似于网关的职责。
关键设计:这里只做 Token 解析,不做鉴权(不抛异常),把鉴权留给后续的 Guard。
export class AuthMiddleware implements NestMiddleware {
  async use(req: Request, res: Response, next: NextFunction) {
    const token = req.headers['authorization']?.replace('Bearer ', '');
    if (token) {
      try {
        req['user'] = await this.jwtService.verify(token);
      } catch {}  // token 无效,静默失败
    }
    next(); // 总是放行
  }
}
这种 Middleware + Guard 分离 的设计带来两个好处:
- 避免重复逻辑+更加灵活: 具体看下节Guard
- 性能:Token 只解析一次(在 Middleware),后续 Guard 和 Controller 直接读取
req.user
Guard:权限守卫
你如果写过 swift 那么你可能对Guard再了解不过了, 这里的Guard也差不多那个意思。 负责决策”这个请求是否允许继续”。它可以访问完整的 ExecutionContext,知道当前请求要调用哪个 Controller 和 Handler。典型用途是:认证检查、角色权限、API 限流
基础认证检查
@Injectable()
export class AuthGuard implements CanActivate {
  canActivate(context: ExecutionContext): boolean {
    const request = context.switchToHttp().getRequest();
    if (!request.user) throw new UnauthorizedException('未登录');
    return true;
  }
}
为什么要 Middleware + Guard ?
AuthMiddleware 负责解析 Token,AuthGuard 负责决策, 设计不但职责单一,而且更加灵活。有些接口需要”可选认证”:有 token 就返回个性化内容,没有就返回通用内容。如果把解析和决策都放在 Guard 里,这类接口就需要重复写解析逻辑。
// ✅ Middleware 已解析 token,直接用 req.user
@Get('feed')
getFeed(@Req() req) {
  return req.user ? this.getPersonalizedFeed(req.user.id) : this.getPublicFeed();
}

// ✅ 强制认证:加上 Guard
@Get('profile')
@UseGuards(AuthGuard)
getProfile(@Req() req) {
  return req.user;
}

// ❌ 纯 Guard 方案:每个可选认证路由都要重复解析
@Get('feed')
async getFeed(@Headers() headers) {
  const token = headers['authorization']?.replace('Bearer ', '');
  let user = null;
  if (token) {
    try { user = await this.jwtService.verify(token); } catch {}
  }
  return user ? this.getPersonalizedFeed(user.id) : this.getPublicFeed();
}
角色权限控制
结合自定义装饰器,实现细粒度的权限控制:
// 自定义装饰器
export const Roles = (...roles: string[]) => SetMetadata('roles', roles);

export class RolesGuard implements CanActivate {
  canActivate(context: ExecutionContext): boolean {
    // 通过反射获取到Metadata数据
    const requiredRoles = this.reflector.get('roles', context.getHandler());
    if (!requiredRoles) return true;

    const user = context.switchToHttp().getRequest().user;
    return requiredRoles.some(role => user.role === role);
  }
}

// 使用
@Delete(':id')
@Roles('admin')
deleteUser(@Param('id') id: string) { ... }
Guard 也适合做 API 限流(通过 Map 记录请求时间戳,超过阈值则拒绝)。
Interceptor:Controller 的切片
Interceptor 是最灵活的装饰器,能在 Handler 执行前后插入逻辑。它基于 RxJS,可以转换响应格式、实现缓存、超时控制、数据脱敏
统一成功响应格式
将所有成功 API 的响应包装成统一格式(失败统一的用 Exception Filter):
export class TransformInterceptor implements NestInterceptor {
  intercept(context: ExecutionContext, next: CallHandler) {
    return next.handle().pipe(
      map(data => ({ success: true, data, timestamp: new Date().toISOString() }))
    );
  }
}
请求返回从:
{ "id": 1, "name": "Alice" }变成:
{
  "success": true,
  "data": { "id": 1, "name": "Alice" },
  "timestamp": "2026-03-14T10:30:00.000Z"
}
缓存查询结果
针对耗时的查询接口,使用 Interceptor 实现缓存:
export class CacheInterceptor implements NestInterceptor {
  private cache = new Map();

  intercept(context: ExecutionContext, next: CallHandler) {
    const cacheKey = context.switchToHttp().getRequest().url;
    if (this.cache.has(cacheKey)) return of(this.cache.get(cacheKey));

    return next.handle().pipe(
      tap(data => {
        this.cache.set(cacheKey, data);
        setTimeout(() => this.cache.delete(cacheKey), 60000);
      })
    );
  }
}
响应数据脱敏
自动删除敏感字段:
export class SanitizeInterceptor implements NestInterceptor {
  intercept(context: ExecutionContext, next: CallHandler) {
    return next.handle().pipe(
      map(data => {
        if (data && typeof data === 'object') {
          const sanitized = { ...data };
          ['password', 'token', 'secret'].forEach(field => delete sanitized[field]);
          return sanitized;
        }
        return data;
      })
    );
  }
}
Pipe:数据转换与校验
Pipe 是数据进入 Handler 前的最后一道关卡,负责数据转换和校验。它在参数级别工作,可以绑定到 @Body()、@Param()、@Query() 等装饰器上。典型用途:DTO 校验、类型转换、数据清洗
DTO 校验
使用 class-validator 定义校验规则:
export class CreateUserDto {
  @IsEmail()
  email: string;

  @MinLength(6)
  @MaxLength(20)
  password: string;

  @IsInt()
  @Min(18)
  age: number;
}
应用全局 ValidationPipe:
// main.ts
app.useGlobalPipes(new ValidationPipe({
  whitelist: true,        // 自动移除 DTO 中未定义的属性
  forbidNonWhitelisted: true, // 发现多余属性时抛出异常
  transform: true,        // 自动转换类型
}));
参数类型转换
NestJS 提供了内置 Pipe 用于类型转换:
@Get(':id')
findOne(@Param('id', ParseIntPipe) id: number) {
  // id 从 '123' 自动转换为 123
}

@Get()
findAll(
  @Query('page', DefaultValuePipe, ParseIntPipe) page: number,
  @Query('limit', DefaultValuePipe, ParseIntPipe) limit: number
) { ... }
自定义数据清洗数据输入
去除字符串首尾空格:
export class TrimPipe implements PipeTransform {
  transform(value: any) {
    if (typeof value === 'string') return value.trim();
    if (typeof value === 'object') {
      const trimmed = {};
      for (const [key, val] of Object.entries(value)) {
        trimmed[key] = typeof val === 'string' ? val.trim() : val;
      }
      return trimmed;
    }
    return value;
  }
}
Pipe 清洗请求数据(输入),Interceptor 清洗响应数据(输出)。
Exception Filter:兜底你的错误
Exception Filter 是最后的防线,捕获整个请求生命周期中抛出的所有异常,并格式化成统一的响应。典型用途:统一错误格式、错误日志、敏感信息过滤
统一错误响应格式
@Catch()
export class GlobalExceptionFilter implements ExceptionFilter {
  catch(exception: any, host: ArgumentsHost) {
    const ctx = host.switchToHttp();
    const response = ctx.getResponse();
    const status = exception instanceof HttpException ? exception.getStatus() : 500;

    response.status(status).json({
      success: false,
      statusCode: status,
      message: exception.message || '服务器内部错误',
      timestamp: new Date().toISOString(),
    });
  }
}
特定异常处理
针对数据库异常提供更友好的错误提示:
@Catch(QueryFailedError)
export class DatabaseExceptionFilter implements ExceptionFilter {
  catch(exception: QueryFailedError, host: ArgumentsHost) {
    const response = host.switchToHttp().getResponse();
    let statusCode = 500, message = '数据库操作失败';

    if (exception.message.includes('unique constraint')) {
      statusCode = 409;
      message = '数据已存在';
    } else if (exception.message.includes('foreign key')) {
      statusCode = 400;
      message = '关联数据不存在';
    }

    response.status(statusCode).json({ success: false, statusCode, message });
  }
}
一个完整例子
把所有装饰器串起来,实现一个完整的用户创建接口:
// main.ts
app.useGlobalPipes(new ValidationPipe({ whitelist: true }));
app.useGlobalFilters(new GlobalExceptionFilter());
app.useGlobalInterceptors(new LoggingInterceptor());

// app.module.ts
export class AppModule implements NestModule {
  configure(consumer: MiddlewareConsumer) {
    consumer.apply(AuthMiddleware).forRoutes('*');
  }
}

// users.controller.ts
@Controller('users')
@UseGuards(AuthGuard)
export class UsersController {
  @Post()
  @Roles('admin', 'manager')
  @UseGuards(RolesGuard)
  createUser(@Body() dto: CreateUserDto) {
    return this.usersService.create(dto);
  }

  @Get(':id')
  findOne(@Param('id', ParseIntPipe) id: number) {
    return this.usersService.findOne(id);
  }

  @Delete(':id')
  @Roles('admin')
  @UseGuards(RolesGuard, RateLimitGuard)
  deleteUser(@Param('id', ParseIntPipe) id: number) {
    return this.usersService.delete(id);
  }
}执行流程示例:
当客户端发送 POST /users 请求时:
1. [AuthMiddleware] 解析 JWT,注入 req.user
2. [LoggingInterceptor Before] 记录请求开始
3. [AuthGuard] 检查 req.user 是否存在
4. [RolesGuard] 检查 user.role 是否为 admin 或 manager
5. [ValidationPipe] 校验 CreateUserDto
6. [Handler] 执行 usersService.create()
7. [TransformInterceptor] 包装响应格式
8. [LoggingInterceptor After] 记录请求耗时
9. 返回响应

如果任何步骤抛出异常 → [GlobalExceptionFilter] 捕获并格式化错误响应
常见坑
坑 1:Interceptor 不捕获 Guard 异常
// ❌ 错误示范
@UseInterceptors(ErrorLoggingInterceptor) // 不会捕获 Guard 的异常
@UseGuards(AuthGuard) // 这里抛出的异常直接到 Filter
export class UsersController { ... }

// ✅ 正确做法:用 Exception Filter 记录所有异常
坑 2:Pipe 修改了原始对象
// ❌ 危险:直接修改原对象
transform(value: any) {
  value.email = value.email.trim();
  return value;
}

// ✅ 安全:返回新对象
transform(value: any) {
  return { ...value, email: value.email.trim() };
}
坑 3:Guard 中执行重逻辑
// ❌ Guard 不应该做数据库查询或耗时操作
async canActivate(context: ExecutionContext) {
  const user = await this.userService.findOne(...); // 慢查询
  return user.role === 'admin';
}

// ✅ 在 Middleware 中预加载用户信息
async use(req: Request, res: Response, next: NextFunction) {
  req.user = await this.userService.findByToken(req.headers.authorization);
  next();
}
总结
NestJS 的装饰器像是一种流水线,一套精心设计的工序:
- Middleware 预处理原始请求(解析 Token、记录日志)
- Guard 做门禁检查(认证、权限、限流)
- Interceptor (Before) 增强请求处理(记录时间戳、修改数据)
- Pipe 清洗数据(校验、转换、过滤)
- Handler 执行业务逻辑
- Interceptor (After) 包装响应(统一格式、脱敏、记录耗时)
- Exception Filter 异常兜底(统一错误格式、日志记录)
每个装饰器都有明确的职责边界。在正确的层级做正确的事,代码才能清晰、可维护。